The carburetor allows you to adjust the density of the air mixture by changing the jets and needles. If the engine itself and the intake and exhaust system specifications are STD, there is no need to replace any parts, but if you have modified the engine and the intake air condition has changed, it may be better to set up the system. However, there are some parts that need to be checked before that. This is important not only when changing settings, but also for carburetors that are used in STD conditions.
At any rate, the oil level is the most important. If it's a multi-cylinder carburetor, it's a prerequisite to get the height correct.
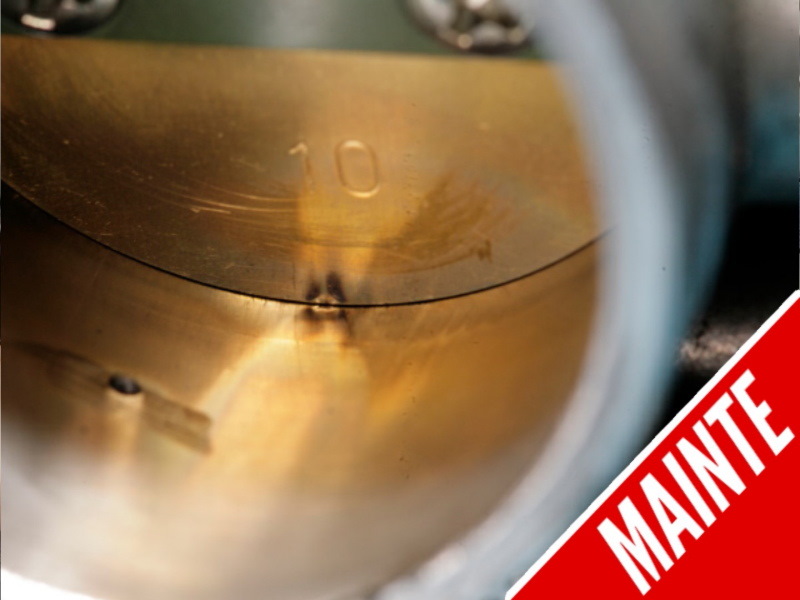
 With the float valve lightly touching the valve seat and the plunger at the rear of the float valve not pushed in, measure the height from the mating surface of the carburetor body and float chamber to the bottom of the float. The float height is indicated in the service manual of many models, but whether or not it can be adjusted when it is out of the specified value depends on the structure and material of the float. In the case of a non-adjustable type, replace the float itself.
 A float valve with a cone at the tip that is in contact with the valve seat may not be airtight and fuel may continue to flow even after the float rises and closes. Also, if the valve seat contact surface is covered with dust or corroded, it may cause leakage.
 Depending on the type of carburetor, some valve seats can be removed. In this case, make sure that the O-rings of the valve seats are not cracked or cut. If you reuse an O-ring that has become crushed over time, it may start leaking due to a change in the point of contact from before removal. If the fuel tank is higher than the carburetor, gravity will try to flow into it if the O-ring fails.
The principle of a carburetor is that the fuel is suctioned out of the float chamber according to the amount of air flowing through the venturi, which is the passage through which air flows. When the carburetor is idling, the amount of fuel suctioned out is small because the throttle opening is small and there is little air flowing through the venturi. As the throttle opening increases, more air flows through the venturi, and more fuel is suctioned out.
Inside the carburetor, a combination of the pilot jet (slow jet), jet needle, and main jet supply fuel according to the intake air volume. Therefore, if the balance of the intake and exhaust system is changed, such as by replacing the air cleaner box with a power filter or changing the exhaust system, and the amount of air flowing for the same throttle opening changes, the size of the jets and needles will be changed to alter the fuel flow rate accordingly.
This is called the carburetor setting, and it is important to understand that this work is done according to the amount of air the carburetor can take in. Even if you increase the number of jets thinking that you can increase the engine power by supplying more fuel, the flow of fuel will not increase if the engine is not receiving air in the first place.
Furthermore, there are a number of points that should be kept in mind as prerequisites for the actual work of the carburetor setting.
The first thing to check is the height of the oil level of the fuel in the float chamber. The oil level in the float chamber is kept constant by the float floating up and down. When a carburetor is developed, a reference value for the oil level is set. If the actual oil level is higher than this STD value, more fuel comes out of the jets and the mixture becomes thicker. The fuel in the float chamber is suctioned out by the negative pressure generated by the air flowing through the venturi, and if the oil level is close to the venturi (i.e., the oil level is high), it can be suctioned up with little negative pressure.
The height of the oil level is determined either by the distance from the mating surface of the carburetor body and the float chamber to the bottom of the float, or by the actual oil level, which is the actual measurement of the amount of fuel in the float. At this time, it is assumed that there is no difference between the specified dimensions and the actual measurement, but in the case of a multi-cylinder engine, it is also important to compare the relative oil level of each carburetor. Even if the jets are changed, the actual amount of fuel suctioned out may increase or decrease if the oil level in the float is different.
It is common to judge the thickness of the air mixture by the burn level of the spark plugs, but sometimes the result of confusion due to different burn levels even though the jet setting is the same is that the cause is uneven oil level height. Of course, there are cases where the burned condition of the plugs is not consistent due to uneven engine intake.
In relation to floats, the airtightness of the float valve and valve seat can also affect the oil level. In a static condition, when the float rises and hits the valve seat, the fuel is stopped, but when it is installed in the engine and vibration is applied, the oil level rises due to the flow into the float chamber from the contact surface of the valve and valve seat.
Be careful with carburetors that have press-fit valve seats and use O-rings. If the O-ring cracks due to aging, fuel may flow into the float chamber from the outside of the valve seat even when the float valve is closed, causing the actual oil level to rise. If the overflow does not stop even after adjusting the float height, check the condition of the valve and valve seat.
- Point 1: Depending on the height of the oil level in the float chamber, the density of the mixing ratio may change even if the jet and needle sizes are the same.
- Point 2: In addition to correctly adjusting the dimensions of the float level and the height of the actual oil level, in the case of a multi-cylinder engine, the variation in the height of each float should also be removed.
Carbon at the tip of the pilot screw affects the fuel flow rate at low openings.
 If carbon gets on the tip of the pilot screw, it will block the pilot outlet passage. This is still minor damage, but if it is heavily adhered to, the low speed may become unstable without increasing the screw's return speed. Crushed O-rings should also be replaced as they can cause airtightness to deteriorate.
 Directly below the throttle valve, at the bottom of the venturi, is the pilot outlet. Even when the engine is idling with the throttle grip released, the throttle stop screw keeps the valve slightly open. At this time, the negative pressure at the pilot outlet is at its highest, and the carbon blown back from the combustion chamber will go here.
 Soak the carburetor in carburetor cleaner to dissolve carbon stains, then polish it with fine steel wool or non-woven cloth. Be careful not to scratch the tapered end of the carburetor while trying to remove the dirt. The return speed of the pilot screw on any carburetor is 1/2 to 3/4 of a rotation.
The air screw and pilot screw affect the setting of the slow system near the fully closed throttle. The air screw controls the amount of air that enters the carburetor from the air cleaner. Tightening the screw reduces the amount of air, which relatively increases the amount of fuel and makes the mixture thicker, while loosening the screw allows more air to enter the carburetor, which reduces the amount of fuel and makes the mixture thinner. In other words, the air screw is a screw that adjusts the ratio of air to fuel in the slow system.
The pilot screw, on the other hand, is located on the outlet side of the venturi and adjusts the absolute volume of the air/fuel mixture in the carburetor. Therefore, if the screw is loosened, more air is suctioned out and the mixture becomes thicker, and if it is tightened, less air is suctioned out and the mixture becomes thinner.
The pilot screw is installed at the outlet of the slow system mixture, called the pilot outlet, and the tapered part at the end of the screw adjusts the area of the outlet. The pilot outlet is located near the throttle valve and is easily affected by blowback from the engine, which can cause carbon sludge to adhere to it. The problem here is when the carbon adheres to the pilot screw. The exit area of the pilot outlet and screw is small to begin with, but if carbon adheres to the screw, the exit area may be further reduced. As a result, the setting from idling to the beginning of throttle opening becomes thin, and the punchiness of the start will decrease.
If the diameter of the pilot jet (slow jet) is increased by focusing only on this symptom, fuel may be supplied more than necessary in the area where the throttle valve opening increases and the mixture outlet switches from the pilot outlet to the slow port, causing the mixture to become thicker.
Attention should also be paid to the condition of the very small O-ring built into the pilot screw. This O-ring is an important component because it blocks secondary air from being suctioned in through the gap between the screw and the carburetor body. Since the pilot screw is located on the engine side of the throttle valve, a large amount of negative pressure is applied when the throttle is closed and the engine is idling. Therefore, without the O-ring, it will try to suction in air through the gap between the male thread of the screw and the female thread of the carburetor. We don't know how much air volume will actually be increased, but the fact that the carburetor manufacturer has incorporated an O-ring here definitely has the purpose of preventing secondary air infiltration.
In other words, if you feel that you need to set the pilot jet, you should check the pilot screw tip for carbon buildup before changing the jet. In other words, if you feel that you need to set the pilot jets, you should check the pilot screw tip for carbon buildup before changing the jets.
At first glance, the oil level in the float chamber and carbon deposits on the pilot screw may seem unrelated to the carburetor setting. However, these parts, which affect the slow mixture, are the parts that should be checked and prepared before starting the actual setting work. Don't forget to clear the prerequisites first before touching the pilot jet and jet needle.
- Point 1: There are 2 types of mechanisms for adjusting the air mixture when the throttle is fully closed and slightly open: air screw type and pilot screw type.
- Point 2: Carbon from blowback on the tip of the pilot screw should be cleaned before setting.

