When rust progresses and the shine disappears, the motorcycle looks dingy and dirty. One of the parts that cannot be replaced as desired is the spoke wheel, because its structure is too complicated, although we want to make it shine somehow. Let's take a peek into the work of a "professional store specializing in spoke stretching" to get a glimpse of their methods and work procedures. Let's take a peek at the work of a "Professional spoke upholstery store" and get some hints on how the work is done and how to temporarily assemble the wheels.
Spokes are only real if it shines.

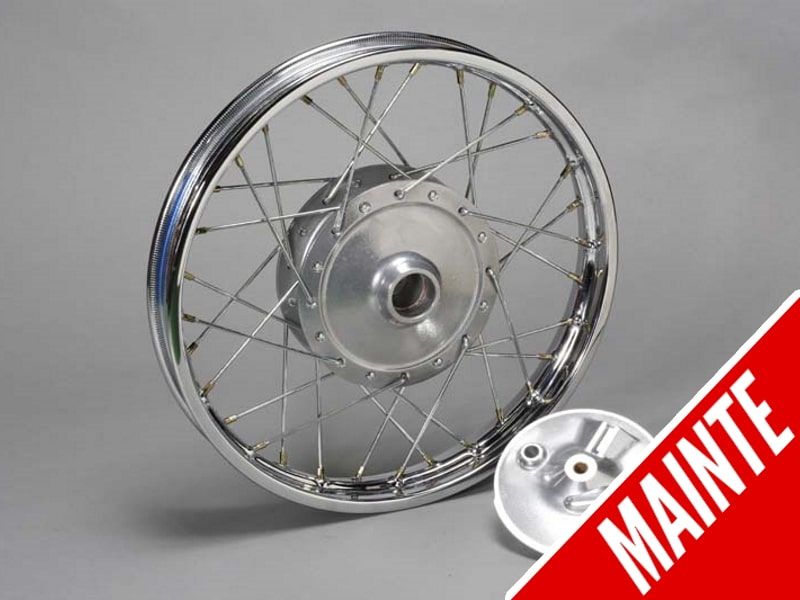
When you want to finish your motorcycle beautifully, the shine around the suspension and brakes is an important factor. Especially for drum brake models, polishing the hubs separately (i.e., taking apart the spokes and polishing the hubs) will certainly improve the finish. Simply by shining the front and rear wheels, the impression of the motorcycle can be changed.
Photography cooperation: Faith
Phone: 0297-36-1363
Prepare new spokes for OEM parts!


When replacing spokes, the basic rule of thumb is to purchase OEM spokes and nipples, but it is not uncommon for OEM manufacturer parts to be out of stock or discontinued, so in such cases, kit parts released by constructors can be used. In particular, for popular models such as the Kawasaki Z2/Z1 and Honda CB750K series, compatible parts have been available from various manufacturers for a long time. When compatible spokes or nipples cannot be found, parts for other models can be diverted, but in such cases, choose parts that not only match the length and thickness of the spokes, but also the bend angle and bend length around the neck. When practicing spoke tensioning, replace the hub bearings with new parts in advance to reduce the wheel's idling resistance.
Let's assemble from the inner tensioned spokes.


Insert the inner spoke, and while crossing it with the left and right flanges (in the case of general tensioning), tighten the nipple evenly and temporarily. After the inner spokes are temporarily assembled, temporarily assemble the outer spokes. At this stage, it is also important to be aware that the hub center and rim center should match.
Nipple "temporary tightening" is extremely important.

Instead of temporarily tightening the spoke end nipples all at once until the tightening threads are no longer visible. By leaving the same number of threads for temporary assembly, it often results in easier centering runout removal work later on. In the temporary assembly temporary tightening stage, it is possible to work only with fingertips, without using tools.
Match hub center to rim center


By using a combination of a long metal scale and a metal scale (steel square) of about 150 mm, the positional relationship between the hub center and rim center can be clarified. After measuring the inside width of the hub and the actual width of the rim, a reference point is set and the nipples are tightened and adjusted to align them so that each center comes out.
Nipple wrench modified for ease of use


There are many different types and varieties of nipple wrenches, so much so that there are several different types of nipple wrenches for the most particular manufacturers. The one that is actually easy to use will be the best nipple wrench for you. Therefore, the product that this is the best is often different for each person. It is also fun to modify a nipple wrench, for example, by chamfering it to make it easier to use.


Faith has a workshop in Bando City, Ibaraki Prefecture. This is one of the best "spoke wheel specialty stores" in Japan, with requests from motorcycle stores all over Japan to stake out spokes. When new spokes cannot be found, complete requests including spoke fabrication are also available. Its knowledge of spoke wheels is just enormous!
- Point 1: New spokes and new rims are easy to work with.
- Point 2: Whether aluminum or steel rims, welding points tend to swing, so let's understand!
- Point 3: Everyone has his or her own method of vibration removal. Let's proceed in a way that is easy for you.
Spoke wheels are characterized by their ability to sparkle under sunlight and lighting rays. Although there are examples of painted finishes in customization, there are generally three types of spoke wheels: unichromium-plated, chromium-plated, and stainless steel. A spoke wheel that is dirty or rusted and lacks shine is never beautiful. In the case of an old motorcycle with unichromium-plated spokes, they have settled into a unique texture, and even if the shine is gone, there is a beauty appropriate for an old motorcycle. The same old motorcycle gives a completely different impression.
Here is a digest report on the spoke tensioning of a Yamaha moped (mini-trail). Knowing the logic, mechanism, and tricks of the trade, the DIY work becomes more enjoyable, which is probably one of the features of spoke wheel tensioning. Some veteran Sunday Mechanics and restoration fans are good at this spoke stretching. The feature of this work is that new discoveries can be made by practicing several times and gaining experience, which is the fun part! Many veteran Sunday Mechanics say, "That's the fun part!"
There is no one-size-fits-all procedure for stretching spokes. In some cases, spokes are stretched to a length different from that of the original manufacturer. Depending on the model, there are cases where all spokes are stretched on the inside, as is the case with some Harley models. Naturally, the work procedure changes depending on the situation at the time. This is why the accumulation of experience is so important.
To see is to believe. There is nothing better than actual experience when it comes to spoke upholstery. As mentioned above, it is not possible to proceed with the work just by looking at the pictures and reading the text. Here, I will explain only a small part of what is likely to go wrong and what you can benefit from knowing during the actual experience. The spoke upholstery process is that deep.
First, purchase the OEM spokes and rims for that model. If they are no longer sold, as in the case of older models, procure compatible parts. Not only the length of the spoke, but also the degree of bend at the end of the spoke and the amount of bend are extremely important. If the wall thickness of the hub side hooking portion is thin, the amount of bend (from the bent portion to the tip of the nail head) can be reduced, but if the wall thickness is thick, the spoke cannot be set unless the amount of bend matches the thickness of the hub side hooking portion. On the other hand, if the amount of bending is too long, the nub protrudes from the flange on the hub side, which is not cool.
In the STD tensioning process, the inner spoke (inserted from the outside to the inside of the hub) is assembled temporarily first, and then the outer spoke is assembled temporarily. Therefore, when the nipple is temporarily tightened, the amount of tightening should be the same. Therefore, if the nipples are tightened unevenly when they are temporarily tightened, the runout of the rim will naturally increase. Conversely, if spokes of the same length have the same amount of nipple tightening (the amount of remaining threads should be the same), the runout will naturally be minimized and the temporary assembly can be done. In fact, there are many cases in which this temporary assembly or temporary tightening of nipples is done improperly, resulting in serious problems later on.
If more care is needed, the hub center and rim center should match as much as possible when the inner hub is finished, and if the outer spoke is temporarily assembled in the same way from that state (the amount of tightening of the nipple is important), a very high precision temporary assembly will be possible in the temporary assembly state before the centering runout adjustment is made. In addition, by placing a height adjusting stand under the rim so that the centers of the hub and rim are aligned when temporarily assembling the nipple (or by using a piece of wood as a stand), the accuracy of the temporary assembly can be improved to an astonishing degree.
To see is to believe but rather, "one experience is better than a hundred words," so let's pay attention to the aforementioned points and try to make the best use of them. First of all, let's become a Sunday Mechanic engineer who can perform highly accurate "temporary assembly". It is literally important to understand the "importance of tentative assembly" before setting the center and runout.