As San-mecha who have painted with a can of spray paint will understand, DIY painting is fun.
However, there must be many Sun-mechs who have experienced that if the arrangements are not made properly or if the work is done in a hurry, the result is not as good as it could have been.
Here, we will focus on the setup and environment that makes DIY painting fun and improves the finished product.
Let's enjoy DIY painting!
Paint booth for "ventilation fan" for housing complexes


I prepared a trash can (cylindrical plastic) of the size used in the room, filled it with a little water, and covered the duct end with a sandbag while setting it so that the bellows duct end would not be submerged in water. If the exhaust air is blown through this puddle of water to blow off dust and mist, and if the mesh of the sandbag acts as a secondary filter, the amount of mist released into the atmosphere should be overwhelmingly small.
Making a Paint Stand with Irector Pipes


Since the frame made of Irector Pipe material in the garage was easier to use than I had imagined, I purchased a new Irector Pipe here and made a special stand for the range hood modified paint booth. Irector pipes can be easily cut with a special pipe cutter. While pressing the blade into the part you want to cut, turn the cutter around and around.
It is very easy to cut. The layout of the pipe and joints should be carefully considered at the design stage.
The adhesive between the erector pipe and the joint is fixed with a special adhesive liquid. Fill a special spoid with the liquid and pour the adhesive liquid so that it soaks into the joint and the pipe. Even if you do not pour a lot of liquid, it will soak into the joint by capillary action.
Preheat drying after degreasing and cleaning


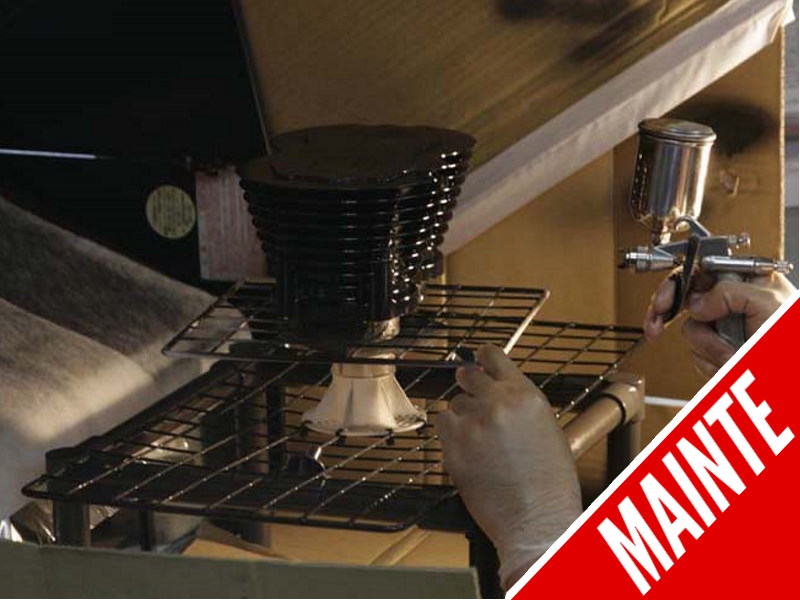
CV Junior, a small high-temperature dryer from Kerbeck. We decided to paint the cylinder for a Kawasaki W650 undergoing overhaul in heat-resistant black. First, the cylinder was heated at a set temperature of 50°C for about 30 minutes. Cold aluminum parts often contain moisture. Preheating at a temperature of only 50°C makes it possible to dehumidify and dry the aluminum surface. This setup = preheating makes it difficult for paint to peel off. This is a common setup process for all aluminum parts.
Paint mist is effectively sucked up by the ventilation fan


After the paint is completed, the temperature is increased from room temperature, and after the temperature in the CV Junior dryer reaches 180°C, the paint is baked and dried for approximately 60 to 90 minutes (the drying hardness will be more stable if the paint is baked for a longer period of time, approximately 2 to 3 hours). After complete conversion, an extremely strong paint film is completed against gasoline and solvents (parts cleaners, etc.). The dirty Kawasaki W650 engine has been beautifully restored.
POINT
Point 1 - The success or failure of DIY painting is also determined by the surrounding environment.
Point 2 - Paint finish while disassembling the engine doubles its beauty.
Point 3 - High-temperature heat-resistant paint with good gasoline resistance
By improving the environment (i.e., work infrastructure) during the spraying process, the painting process becomes more enjoyable than ever before. Not only is it more enjoyable, but the important thing is that the finish is also improved. There must be many Sanmeka who have wished to have a small booth for painting small parts but cannot have a large paint booth like a pro store. A single side stand is often manageable, even if it is sprayed in the open air.
However, when it comes to the frame itself, the parts are too large to be painted well, and the continuous spraying may cause complaints from family members and neighbors about the paint mist and odor. Therefore, for large parts such as frames, it is best to entrust them to professionals who can guarantee a reliable and excellent finish.
In addition, if the work proceeds without spraying in an open-air environment, the body of a motorcycle or a transporter left in the neighborhood may become crusty. I have had this experience many times in the past, but I managed to deal with it by using a mist-removing Nendoroid to scrape off the adhering mist each time. In particular, urethane paints require special care because they adhere strongly when adhered to, and it took a long time to remove them completely.
I had such experiences many times in the past, so I decided to make the time more enjoyable by building my own paint booth, where I could paint small parts with ease and not be bothered by people around me. I decided to make my own paint booth with a unit ventilation fan for a housing complex.
This time, through painting an air-cooled cylinder for a Kawasaki W650 undergoing engine overhaul, we objectively observed the usability of a self-made paint booth. When you concentrate too much on DIY painting, you cannot pay attention to the surrounding environment. I thought it was extremely important to make an objective evaluation. Here are some of the things I noticed.
- Duct extensions should be larger and overhanging.
- Some parts are easier to paint when suspended, so the workbench needs to be modified.
- The primary filter capacity should be increased to adsorb more paint mist.
- Dust bellows should be as long as possible (currently too short).
- Increase the capacity of the secondary filter to better adsorb exhaust mist.
- Enclosing the area around the secondary filter will prevent the mist from spreading.
Various ideas came to mind, such as the following. I would like to enjoy DIY painting in a better environment while squashing these pending issues in the future.