Here are some of the maintenance methods that I would like to share for your reference from the Webike Community MOTO HACK MAINTENANCE Campaign. Maybe you have an idea that you'd like to try!
In this article, I would like to introduce a maintenance HACK from Sukesuke, who rides a TDM900!
Motorcycle introduction and its maintenance
About the motorcycle

Yamaha TDM900
Working process
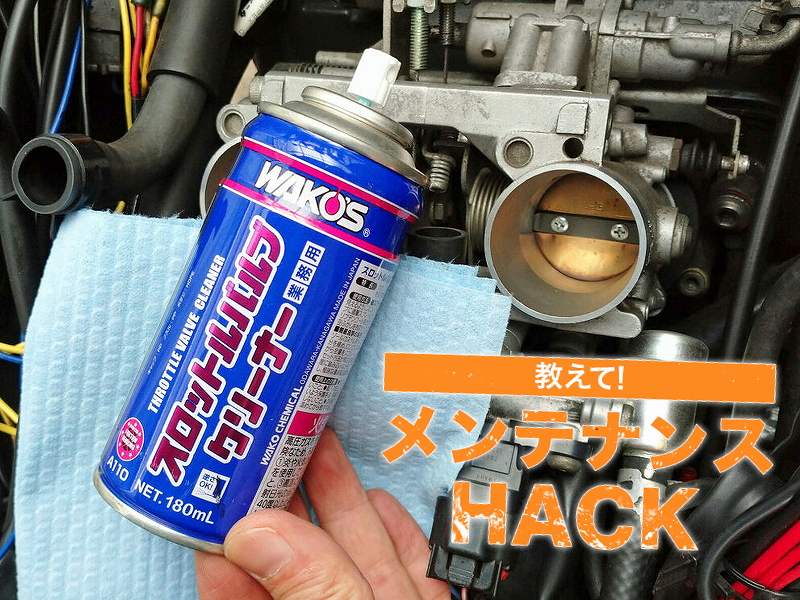
This is the cleaning of the throttle body (around the throttle valve).
Generally, this is done on overdriving motorcycle, but in the case of TDM, it is one of the regular maintenance work.
Modern motorcycles have an Idle Speed Control Valve (ISCV), which is a separate path for airflow at idle, but older FI motorcycles such as TDMs use only the butterfly valve to regulate the airflow all the way from idle to full throttle. When this butterfly valve part gets dirty, the mild symptoms are just a jittery feeling at idle and low speed, but if it becomes severe, the motorcycle will stall just by opening the accelerator pedal quickly, or the accelerator doesn't respond very well, and then it will suddenly go boom! Acceleration and low speeds can be very difficult to ride.
Here's what happens when you clean the throttle valve. Even if you jiggle the gas pedal a little bit, the sound and the explosion will be followed up tightly. The responsiveness of city driving with a lot of stop-and-go traffic will be much more responsive, which is a far different thing than an engine that seems to stall while jerking around.
Working hours
If you're familiar with the process, it will take 30 minutes, and even if you're unfamiliar with it, it won't take more than an hour, but if you've ever replaced an air cleaner, it will take an equivalent amount of time.
Working difficulty
If you've never cleaned a throttle valve before, it might seem like a lot of work, but in the case of the TDM, it's not hard to do. The air cleaner is easy to remove and because it's a two-cylinder, it doesn't require a lot of work. It may be easier than replacing the air cleaner (filter replacement) because you don't have to disassemble the air cleaner box.
Items to use
Accelerator Locking System Evo
Brand: GRANDTOUR
TV-C Throttle Valve Cleaner
Brand: WAKOS
4 Vacuum Gauges
Brand: DAYTONA
Learn more about the work
It's just an image, but as dirt builds up in the butterfly valve area, it will block the air that should be able to enter in small amounts. Naturally, the idle speed will drop and the butterfly valve angle will be widened to allow more air to enter. After this repetition, the wall of carbon buildup will become air resistance, and the wall will be blocked by a quick accelerator reaction, and sometimes the air will flow in all at once.
It's weird that the air is coming in from the air cleaner in the first place, but the dirt is building up. This is all a detriment to circulating blow-by gas. So the other side of the benefit of reducing the environmental impact is summed up in this part of the system.
This time, we'll be removing the red-painted (though the real thing is black) carbon in the image.
Work Procedure
1) Remove the seat.
2) Remove the side panels on both sides.
(4 x 6 hexagons and 1 plastic rivet for the lower portion)
3) Remove the side cover under the fuel tank.
(1 Phillips screw)
4) Lift the fuel tank.
I lift the fuel tank by removing the 12mm bolts on both sides that hold the frame and the fuel tank in place, but there are many ways to hold the fuel tank in place while it's lifted. In my case, I pull it with a rubber rope and fix it with the rear carrier. The rubber rope is homemade for securing the fuel tank, I cut it to just the right length and attached hooks at both ends.
One thing to keep in mind is that if you have a full fuel tank, it will leak. Reduce the amount of fuel to about half before you lift it.
5) Remove the air cleaner box.
Remove the 10mm bolt that holds the air cleaner box to the frame and loosen the clamp at the joint. The clamp is fixed with 3mm hexagon, so when loosening it, you might want to use a good number, such as just three rounds of it, so that you don't forget the original torque.
Then disconnect the three hoses (two on the left side and one in the center) that lead to the air cleaner box and the intake air temperature sensor connector at the bottom of the air cleaner box and move it away from the motorcycle.
It's hard to remove all the hoses on the air cleaner box, so once you've removed them to some extent and have more freedom, you can hang them around the handlebars with wire or string.
The trick to shortening maintenance time is to prepare these hanging wires as "special jigs". You can save a lot of time by preparing simple tools such as a rubber rope to lift the fuel tank, a wire to fix the air cleaner, and a bag to hang the brake caliper.
6) Clean the inside of the throttle body.
The area to be cleaned is not the throttle valve (butterfly valve part), but the bore side of the throttle valve, towards the air inflow path. Generally, the butterfly valve part has a molybdenum coat, and people say that if you scrub it too hard, the coat will come off, but the TDM doesn't seem to have it. I think the purpose of the molybdenum coat is to improve the seal in the first place, so I'm guessing it's not coated on the older ISCV-free throttle bodies (sorry if I'm wrong).
The butterfly valve part is connected by wires, so you have to twist the gas pedal and hold it open to remove the dirt. If you have an accelerator lock, it will be easier to clean, but you can also clean it with your left hand while holding the accelerator open with your right hand.
With the throttle closed, I'm not sure where the dirt is.
Open the throttle and you will see a black streaky build up of dirt. This dirt is the carbon in the blow-by gas, which is unavoidable on any motorcycle that is circulating blow-by gas.
If it's a modern motorcycle, it's not a big problem, but on an older motorcycle like a TDM, it's a nasty problem. I think I'd be happier cleaning this place up than I would be adjusting the screw (widening the angle of the butterfly valve) thinking "my idle has been low lately, let's go UP".
On some motorcycles, the underside of the butterfly valve area is also dirty due to blowback from the combustion chamber in addition to blow-by gas, but I've never seen this on a TDM. The only thing to be wary of is the blow-by gas.
You can use the parts cleaner to remove the dirt and grime, but there are also special products sold for this purpose, such as "Wako's Throttle Valve Cleaner". The parts cleaner is too strong and will take away the molybdenum coating, but the special version is safe and will not cause too much damage even if the cleaner falls into the combustion chamber.
The trick to cleaning is not to spray the cleaner directly into the throttle body. The back of the butterfly valve area is the combustion chamber, so it's best to avoid letting the cleaner slosh in. Spray it on a rag before cleaning, or if it's too dirty, put it on a brush and scrub it off.

By the way, fuel one and other fuel additives do not go through the butterfly valve of the fuel tank because the path is from the fuel tank to injectors to the combustion chamber. Injectors are located at the back of the butterfly valve, so fuel additive systems are not effective for this contamination.
I also question the effectiveness of the type of cleaner that you spray from the air cleaner box (a common cleaner and conditioner in cars). I don't think blow-by gas stains are sweet enough to be removed by just blowing on them, as they are a hardened mass of oil mist. Scrub it off with a rag soaked in the cleaning agent.
Both fuel additives and spray-on conditioners are immensely effective in removing carbon from the combustion chambers, but I don't think they are very effective on the throttle body.
7) When you're done cleaning.
Put back the connectors and hoses that were removed, install the tank and cowl, and you're done. Be careful to check carefully which one is up and down or left and right so that the hoses and harnesses don't get caught forcibly. There is also a fuel hose under the tank, so if it's stuck somewhere, you won't be able to start it. If you're unsure, I think it's a good idea to leave a picture of the various angles before you remove it, so you don't have to worry about how to handle it when you put it back on.
[In addition: negative pressure tuning of the injection cylinders.]
One thing that's easy to do at the same time as cleaning the throttle valve is to synchronize the negative pressure in each cylinder, and since the TDM is a two-cylinder, we're talking about two cylinders that are happier when they're nicely synchronized.

Do you need to be in tune with a FI motorcycle in the first place? But old structures like the TDM have to be tuned by turning an air screw like a carburetor. What you need for negative pressure entrainment is a vacuum gauge. I think that any commercially available vacuum gauges are good, but I use the Daytona 4 gauges with the same markings because the service manual indicates kPa (kilopascals).
Another commonly available notation is cmHg (centimeters of mercury), which can also be used. When converted from kilopascals, 1kPa = 0.750064cmHg, so if the specified value is 35kPa, it would be 26.2cmHg.
The difficulty of the job is easy if you can connect the negative pressure hose, in the case of the TDM, it depends on whether you can remove the negative pressure cap here and connect the hose, as the left side throttle body is too narrow to get to it.
The part of the assignment that takes the negative pressure on the left side is the red arrow in the photo.

This part is originally covered with a rubber cap, so you can remove the lid and connect the hose. I have a NAG internal pressure control valve installed and the same hose is already installed in this part. But if you want to use TDM for tuning in the future, you might want to install the rubber hose beforehand.
You can use the hose under the air cleaner box to connect to the variable air intake duct. If you plug it into the vacuum gauge, you will be able to measure the negative pressure.

The image shows the location of the air screw on the left.

After connecting the vacuum gauge, turn the air screw to adjust it. The negative pressure of the screw increases with the right rotation of the screw and decreases with the left rotation in the direction of loosening.
You can see how much negative pressure is generated from the gap in the butterfly valve when the accelerator is fully closed. Since the adjustment air screw is located at the back of the butterfly valve, loosening the screw means that air is coming in from outside the butterfly valve gap, which reduces the negative pressure. All modern motorcycles are electronically controlled, so these little adjustments are not necessary.
Basically, the rule is to not touch the left side cylinder and align the right side to the left, but the air screw itself gets dirty in the first place, so I think it's best to remove it from time to time to clean it or replace it with a new one.
You have to remember the number of times to turn the air screw, and it can be a bit tense. If the right side is lower than the left, I close the right side all the way and loosen the left side. On the other hand, if you loosen it too much, you will intentionally create secondary air, so I don't think it's better not to loosen it more than 1 turn.
This is the location of the air screw on the right. This one is wider and easier to work with.
By the way, the TDM allows you to adjust the air screw without having to take it apart at all. The tool you need is a long flat head screwdriver, which I use by shaving one I bought at 1 USD (machined so that the tip of the screwdriver fits into the head of the screw).
The specified value for TDM negative pressure is 33 to 36 kPa.
Here, when the left side was fully closed, it was 35 kPa, so we matched the right side as well. By tuning it up, it will be smoother and less inconsistent, which will make low speed driving much more stable and reduce vibration during acceleration.
I don't know how much accuracy you can get with a vacuum gauge that costs about 100 USD, but the cause of low negative pressure may be the deterioration of the intake manifold = secondary air, or the misalignment of the valve clearance or the wear of the piston ring = compression leak, so I think it is easy to notice the early detection of problems by measuring the negative pressure periodically.
The difficult part is connecting the negative pressure hose, and if you take measures in this area, you will be able to clean the throttle valve in about 10 minutes. I meant to write this as an added bonus, but it's been a long time. Sorry. That's all I have to say.
Advice
Twenty years ago, when FI was first introduced to motorcycles, there were still many mechanical parts that were leftover. The throttle body is a prime example of this, but if you look at it differently, you can think of it as a part of the motorcycle that needed a human touch. If this was a badly maintained motorcycle, I would cry, but in the case of the TDM, the point is that the maintenance is outstanding.
Replacing the plugs and air cleaner, for example, doesn't make a dramatic difference. Most of them are replaced before the lifespan of the part, so you don't really feel the change, but for TDM, cleaning the throttle body is such a fun thing to do that you can't wait to get it riding.
My cleaning frequency is about once every two oil changes, just like with the oil filter. If you're a person who changes the oil every six months, I would imagine you would spend roughly 30 minutes cleaning the throttle body once a year. There are two types of motorcycles that you should be proactive about cleaning the throttle body, like TDM, and the other way around: motorcycles that you should not clean.
The motorcycles that are better off without cleaning are the ISCV models, which are less affected by dirt on the throttle valve due to their construction. Scrubbing such motorcycles may cause the coating to come off and you may have to recoat the motorcycle. And if it's an electronic throttle model, you can't clean it, or it's a good thing you don't touch it. I recommend that you understand what your motorcycle is made of before you work on it.
If you clean a vehicle that hasn't been cleaned for a long time, the idle speed should be higher. This is because more air will flow into the combustion chamber as the previously blocked air passage widens. Adjust the idle speed the way you want it to be adjusted on each bike, on the TDM there is a knob under the fuel tank on the right side.
If you include cleaning of the throttle body in your regular maintenance, you can overcome the only flaw of the TDM that makes it difficult to handle at low speeds. Once the shortcomings are gone, the rest of the motorcycle will be a good thing, so I'd like to encourage you to try this area of maintenance, thinking it's "the kind of subtlety only an old motorcycle can have".
Thank you for posting this valuable maintenance HACK, Sukesuke! You will receive 1,500 points to spend at Webike!