Many motorcycles produced before 1955 had aluminum nameplates or caution plates riveted to the motorcycle. Since the 70's, printed aluminum nameplates have been glued on like stickers, but if the nameplates are dirty or the color is faded, the quality of the finished motorcycle will not be as good as it could have been. Let's try to restore the nameplate on a Yamaha YA5 that has been almost fully restored but still has a dirty nameplate.
- Start by understanding the current situation and making arrangements
- First, carefully reproduce the board shape
- Use of FRP mold release agent in applications
- Apply to the masking area with a fine brush
- I would paint after masking
- Peel off the film with the tip of the design cutter
- You can see the difference before and after.!!
Start by understanding the current situation and making arrangements

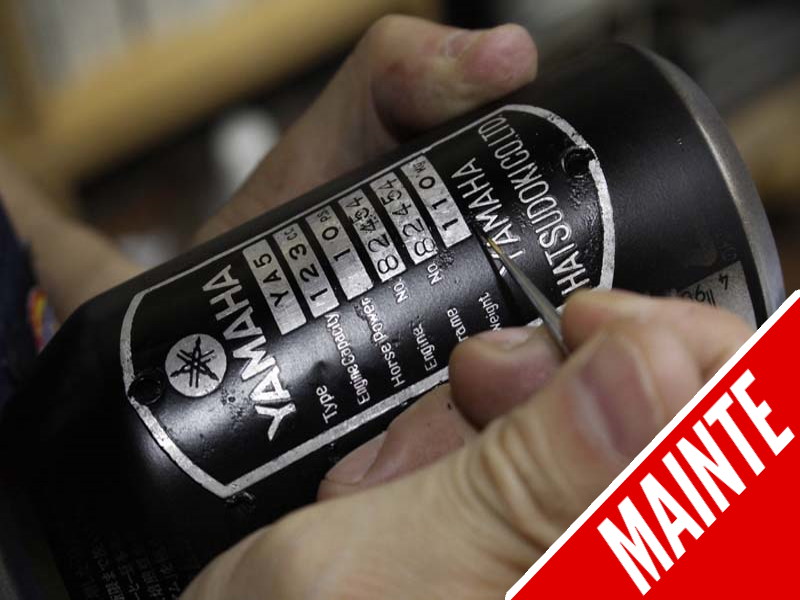
The Yamaha registry nameplate riveted to the front of the steering head pipe. In this era, Yamaha vehicles had the frame number clearly marked on the nameplate, rather than directly on the frame. Unlike modern motorcycles, the frame number, engine number, displacement, and other details were clearly indicated. The nameplate was difficult to remove from the steering head pipe. I'll be lucky if I can read the dirty, scuffed, and bleached letters properly. What kind of procedure do we have to follow? The first step was to remove the dirt and old paint with a tissue soaked in acetone.


Since it is not easy to work without fixing the nameplate, I prepared a round timber of almost the same thickness as the steering head pipe of the frame. The nameplate was pressed against the lumber, and the round shape of the lumber was damaged by hitting it with a rubber hammer, and the edge was gradually corrected.
First, carefully reproduce the board shape


The upper and lower hole portions that were fixed with rivets were indeed crushed by the rivets that were hammered in. When there is an obvious break or crush, I used tapered radio pliers to fix it without scratching the nameplate. For crushes that could not be caused by pliers alone, flat punches were used to tap it out from the backside. At this time, the iron plate was used as a support plate, and the work proceeded carefully so as not to make the plate protrude to the front side by striking too much. The dirt on the backside was removed well.
Use of FRP mold release agent in applications


After modifying the shape of the base aluminum plate, it was time to paint, and the film-type mold release agent "Rigolac" came into play. This film-type mold release agent is used for masking the detailed letters. Since it is colorless and transparent, it is easy to see whether it has been applied or not. It's hard to tell if it's been applied or not. It is difficult to tell if it is painted or not. So, I mixed some pigment for Rigolac and colored it just a little bit before using it. This is said to make it easier to distinguish the paint.
Apply to the masking area with a fine brush

Pigmented toner is mixed with Rigolac, a colorless transparent film-type mold release agent, to give a slight orange color. By using it in this way, the boundary between painted and unpainted areas is more or less clear. There are various types of fine brushes. Some products have different bristles, so it is a good idea to prepare several types and compare them.
I would paint after masking


I'm looking for a workbench that is light and easy to hold. I set the nameplate on a canned coffee bottle that I was about to drink. The dimensions were almost exactly right! Premium BOSS black. After finishing the rest of the bottle, I attached the nameplate to the side of the canned coffee using double-sided paper tape with weak adhesion. After applying a release agent, I sprayed black urethane paint on it. It looks lumpy, including the thickness of the release agent, but what kind of finish will it really have?
Peel off the film with the tip of the design cutter

The sprayed black urethane is mixed with a matting agent called flat base to achieve a slightly matte finish of about 7 minutes luster. In order to cure the paint film completely, it was put into the dryer and dried at 50℃ for about one hour.


Urethane paint seems to be harder and less easily scratched, so it seems to be easier to work with than lacquer. When the release agent is removed using a design cutter or tweezers, it looks beautiful. At this point, I prepared a 150mm metal scale and attached a water-resistant paper of No.800 to the tip of one side with double-sided tape. It seems to be used for polishing the aluminum surface of the edge.
You can see the difference before and after.!!

On the left is the nameplate after completion and on the right is the nameplate right after removal from the frame. The beauty of the restoration can be seen in this picture. It makes me happy to restore it.
In cooperation with: Model Create Maxi
- Point 1・When removing the nameplate from the vehicle body, proceed with caution. If the nameplate is firmly fixed with rivets, loosen the rivets first.
- Point 2・ When the rivet fixing position is like a board and the rivet tip is sticking out on the backside, it is good to hit the tip with a flat punch from the backside.
- Point 3・ When applying mold release agent, prepare several kinds of fine brushes. Use not a brush but a firm brush for accurate work progress.
- Point 4・ Let's be careful not to give damage to the paint by finish polishing!
When you compare modern motorcycles with old ones, there are a surprising number of parts that give you a culture shock and make you wonder what it is. This is evident in the comparison of materials used for body parts. In the latter half of the 1950s, plastic resin began to be used for exterior parts, but at that time, the material was referred to by the manufacturer's registered trademark name or product name (for example, Hi-Xex = leg shield of Super Cub), rather than the standard label for resin, such as "PE" or "PP. Incidentally, some manufacturers manufactured gasoline tanks using copper sheet materials. There were also cases where copper sheet pressed parts were brazed or soldered together.
From the time the Super Cub was introduced, many of the exterior parts of small motorcycles were made of plastic. In the 1960s, ABS resin (developed by DuPont in the U.S.) began to be used in large numbers, but it was not until the 1970s that ABS resin began to be used in earnest in the motorcycle world. However, it was not until the 1970s that ABS resin began to be used in earnest in the motorcycle industry. In any case, resin parts are known to be vulnerable to ultraviolet rays and to fade and deteriorate easily. However, on the other hand, they were extremely suitable for mass production, and thanks to such repeated technological innovations, Japanese industrial products were able to compete in the world market and boast the world's largest production volume.
This time, it is the restoration and reproduction of aluminum sheet parts. As mentioned above, before the early 60's, many motorcycles were made from steel and aluminum. If you look at the motorcycles of those days, you will find that many of them had "nameplates" riveted to the body and engine. These plates included the name of the motorcycle, production markings, and the Ministry of Transport's type approval label. In the case of engines, there were many cases where the nameplate said "MADE IN JAPAN" or the "type" of the engine installed.
This is the model nameplate for the Yamaha 125YA5, which was introduced in 1961. It was riveted to the steering head pipe, clearly indicating the name, model, and engine output. The nameplate had been left in the open air for several decades, and we wondered if it was possible to recreate the nameplate of the Yamaha 125. As usual, I brought the parts to Model Create Maxi and asked if they could be reproduced.
If it were in better condition, the finish would obviously be better, but it's such a tattered piece. Let's do it! So we set to work. A few hours later, as you can see, I was very happy with the result. Surprisingly, there are many fully restored motorcycles where the motorcycle is beautifully restored, but the nameplate is still dirty. If you know any of them, you should try to restore the nameplate.